Friday, April 25, 2014

Two Knit Edging from 1885


Two Knit Edging
While cleaning out some book shelves at the BCCD Roger Gustafson Nature Center, Boone County Conservation District staff came across a cookbook from the late 1800’s. The name of the book was The True Blue Cookbook by the Ladies of the Central Presbyterian Church, Terre Haute, Indiana.
Inside the front cover was an inscription written in ink; Mrs. D.C. Cuming, Christmas 85.   Since the book was published in 1885 it is likely that it was given as a gift.
Over time Mrs. Cuming pasted hand written receipts (recipes) household tips and health care remedies onto the existing pages. There were also recipes and notes written directly on the pages.  As a knitter the entry shown below was interesting and a challenge.  Could the knitting language be translated into today’s terms? Could this lace edging be produced and what would it look like?
The first step was to type out the exact wording of what Mrs. Cuming had written, then decipher what she was saying into today’s knitting terms.  It took several tries at knitting from the pattern and finding mistakes in the translation until it finally clicked: there was a definite and easy to memorize pattern here.  Once the pattern is memorized, the lace edging can be knit without having to look at the written pattern. Below is a picture of the original handwritten pattern that was pasted into the cookbook.  This is a wide trim and would have been used at the bottom of an underskirt.  Today it can be used to trim a pillow or edge a blanket.


Two Knit Edging- Modern Translation
Use wool lace weight or fingering yarn.
Size 0 or 00 knitting needles
Terms-   k- knit
K2 tog- knit 2 together
                yo- yarn over
           
Cast on 14 stitches using the long tail cast-on.  Knit row.

Beginning of pattern
Row 1-knit 2, yarn over, knit 2 together, repeat till last 2 stitches of row. Yarn over, knit 2 (15)
Row 2- knit
Row 3- K2, yo, k2tog, * Yo, k2tog, k1 (repeat from * till 2 stitches left in row) yo, k2 (16)
Row 4- knit
Row 5- k2, *yo, k2 tog, yo, k2 (repeat from* till last two stitches) yo, k2 (20)
Row 6- knit
Row 7- k2, *yo, k2 tog (repeat from* till last two stitches) yo, k2 (21)
Row 8- knit
Row 9- k2, yo, k2tog, *yo, k2tog, k1 (repeat from * till last two stitches) yo, k2 (22)
Row 10- knit
Row11- knit (you should end up on the end that has a tail from the cast on)
Row 12- yo, k2tog, knit
Row 13- knit 1 bind off 8 stitches, knit remaining 13 stitches (14)
Row 14-knit

Repeat rows 1-14 till edging is length desired.
Block and pin to open up the lace pattern.
Note: Bottom edge will have a slight arc as you knit and will lean on the diagonal.  This can be straightened when blocked.


Tuesday, May 22, 2012

The Greening of the Gardens

We have been out in the gardens planting all the veggies that we started in the green house.  Cabbages, kale, leek and onions are just a few.  We have taken out around 50 trays of plants but the greenhouse still looks full. It is a phenomenon that happens every year. We plant a few flats and the next thing you know the greenhouse is jam packed with plants everywhere. I swear they multiply at night.

The German garden is planted and will have a new look this year. We have planted it in squares as German settlers would do in their kitchen gardens.  The Scottish is almost done but we are still working on the herb garden in the center.  Red ants had taken up residence and were swarming us as we planted the northwest corner.  The Norwegian will be planted next week , the Yankee also and a volunteer will be planting and maintaining the Potawatomi garden.

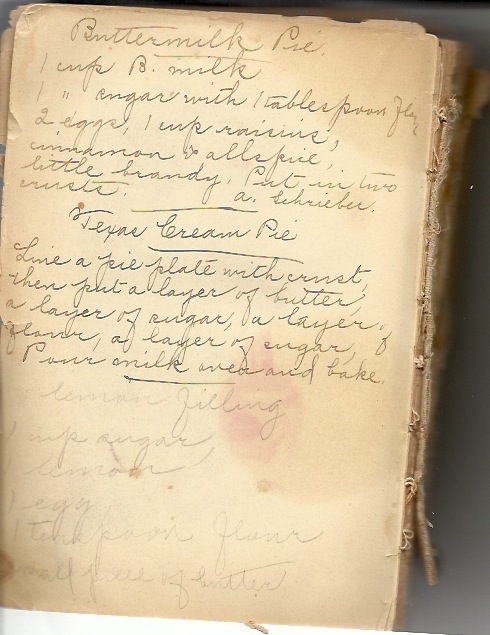
Below is another page from the 1893 cookbook. The name of the cookbook was Three Meals a Day: A collection of valuable and reliable recipes in all classes of cookery. With toilet health and housekeeping departments, by Maude C. Cooke. The cookbook in itself is very interesting but what I really enjoy about it is the handwritten entries that the owner wrote in the page margins, sewed onto pages or pasted in. This was her go to book!  Her name was Stella O'Brien and she was a postmistress. I don't know where she lived but I bought the book in Illinois so maybe there.
Buttermilk Pie and Texas Cream Pie Oh My!

Thursday, May 10, 2012

Cooking 1800's Style

On June 9th BCCD will be having a wood stove cooking class. I really like cooking in the cabins on the wood burner so I thought I would teach a class on how Great Grandma prepared her meals.  I am using recipes from the Heritage Gardens Cookbook and we will be preparing meals that represent each of the 5 heritage gardens.  Unfortunately because of the size of the cabin I am having to limit the class to 10 people.  Since everyone else can't come I will publish pictures and recipes from the class for several weeks after the class.

Until then I am going to share pages from an 1800's cookbook I own. The previous owner, Stella O'Brien, was a postmistress, (where I do not know but most likely somewhere in Illinois), and had sewn in and pinned and handwritten recipes, and household hints into the published pages of the cookbook.

Below is a page that has a cure for Rheumatism and a receipt or recipe for Chilla Sauce.


Wednesday, March 14, 2012

The Temperature is What?

It is March 14th. Again March 14th and the temperature is going to be 82degrees, farenheit! I am kinda old but I don't remember it ever being this warm in March.

I am going to go out to the gardens and check things out but I will resist the urge to uncover anything. I have lived in Illinois long enough to know better. Next week will probably be in the 30's.

We are in the process of booking garden tours, programs and special events. Call if your group would like to book a tour.

A calendar of garden events will be posted soon.

Enjoy the weather!

Thursday, February 23, 2012

Seeds,Seeds and More Seeds

There are still seeds available at the BCCD Roger Gustafson Nature Center at 603 N Appleton Road in Belvidere. If there is a certain variety you are looking for you can email me to check availability. We still have a lot of tomatoes, and beans; our favorites!

Sunday, February 19, 2012

It's been a long time between blog posts.

The last year has gone by quickly and the blog lay dormant while we planted, weeded, and harvested in 2011. I am going to try and be diligent about posting this year.

We had our annual heirloom seed sale yesterday and it was encouraging to see all the people who showed up to purchase seeds and sit in on our programs. More than 160 people came out. We sold a lot of seed packets and almost all of the seed catalogs are gone. We still have a great variety of seeds left and some Baker Creek and Select Seed catalogs available, so stop by the BCCD office.

Boone County Master Gardener Mitzi Kelley gave another fantastic program on Organic Gardening. She is so knowledgable and we appreciate her doing this program for us each year. You always learn something new from her, even if you have been to her presentation before.
Aaron Minson, Boone County County Conservation District Prairie Restoration Specialist, gave a really interesting presentation on the preservation work done at BCCD and gave tips for using native plants in home landscaping. He talked about the preservation goats that BCCD uses (learn more about them at the BCCD website) and had a really great power point presentation.

Space was tight in the Roger Gustafson Nature Center as people poured in to browse the seed boxes and purchase their packets of seeds. Coyote kept watch over the event and made sure that everyone got their free seed catalogs before they left.

With the sale behind us, we will be out in the greenhouse getting ready to start sowing seeds for this year. First to be planted will be the leeks. I can't wait to get my hands dirty again!

Wednesday, March 30, 2011

We're Back In The Greenhouse!

It has finally warmed up and we are back in the greenhouse starting seeds for the 2011 growing season. Yesterday we started our cold weather crops, some herbs and flowers.

Leeks and onions were the first to be sown. We put the newly planted flats on a warming bed. In a few weeks we will have hundreds of threadlike sprouts that we will eventually have to transplant. Not my favorite job. I am always afraid I will damage them. They seem to survive my transplanting and by mid-summer they are growing strong. It always amazes me how such sturdy plants can come from such tiny seeds.

Cabbages were next. We grow a lot of cabbage. We grow about 7 different kinds of cabbage for our Norwegian, German, Scottish and Yankee gardens. We plant alot of cabbage since we have to replant what the groundhogs eat. They insist that we share!

Spinach and greens were also started plus we direct sow in the gardens.

We started some herbs and flowers that we will be selling at our plant sale. We are going to have a good variety of heirloom annuals. Morning Glories, Holly hocks, Sweat Peas, Nasturtiums, Love in a Mist, Sweet William and Johnny Jump Ups are a few of my favorites. We do not have an exact date for the sale yet but it will be sometime in May.

Next week we are hoping to get into the gardens to till. This week the ground is saturated from all the snow and rain we had. We also have to replace one of our hops poles. It broke right at the base and we will have to dig a new deep hole and replant it. The hops poles have been in the German Garden for 10 years.

After a long winter it is always a good feeling to get your hands dirty and start planting.

Sunday, May 2, 2010

Feed the Gardener

Gardening is hard work. The payoff is good food. After a morning in the garden I am always hungry. Today I came in from the garden with a taste for pancakes. I always make mine from scratch since they are so easy. I use a recipe for buttermilk pancakes but instead of buttermilk I use organic yogurt with fruit in it, or soy yogurt. I add a little water to thin it if the batter is too thick. The yogurt makes the pancakes moist and flavorful. To top them off I use my step-dad's homemade faux maple syrup. It is easy and foolproof. Maple syrup is very expensive and store bought pancake syrup is full of high fructose corn syrup.
My homemade has lots of sugar but since I only use syrup once or twice a month I think it's okay to splurge.

Here's the recipe:

3/4 cup brown sugar
1/4 cup white sugar
3/4 cup water
1/2 cup corn syrup (I use Karo brand lite corn syrup with vanilla. It contains corn syrup, salt and vanilla. Other corn syrups contain high fructose. Check your labels!)
1/2 tsp. Mapeleine or maple extract
1/2 tsp. vanilla extract
1/2 tsp. butter extract

Add sugars, water and corn syrup in a pan. Heat till boil, then boil for 7 minutes. Remove from heat and add extracts. Stir well. Let cool and pour into syrup container. Enjoy!

Monday, November 16, 2009

Taking Work Home

Everyone tends to have the habit of taking their work home with them. Even gardeners. The work we bring home is a little different. Today I have brought home pumpkins. I need to clean them, cook them, save the seeds and freeze the pulp.
Photobucket
These are some of the pumpkins I brought home; Winter Luxury (far left) is the one with the cantaloupe like webbing, Cinderella (far right), Seminole, it's the small one with the writing on it (Pat leaves me notes on produce)Photobucket and Amish pie. The other small ones are some I grew in my garden at home but can't for the life of me remember the name.

Years ago I had the great idea that I would can my own pumpkin. I love making jams and jellies, pickling beets, canning fruit and making dilly beans. Pumpkin however is not a favorite for canning. As I found out it takes a pressure cooker. I have had a fear of pressure cookers ever since my Grandma's exploded all over the kitchen and I had to help clean up the mess.

So I came up with an alternative; freezing. It is so muck easier. I bake halved pumpkins, I puree, I pour into freezer bags, I freeze. Anytime I want to make a low-fat cake from a mix I pull out a bag of pumpkin, thaw it for an hour in cold water, open the bag and mix.

I use the pumpkin for pies, pancakes, Rachael Ray's Most Awesome Whoopi Pies, and cookies. I love anything pumpkin.

I save the seeds for work. We process them and then replant. We sell the extras at our seed sale. The baked rind gets put out in the compost and usually gets eaten by squirrels and raccoons. They love pumpkin too!

Tuesday, November 10, 2009

And the Winner Is...

Since I am a softie I decided that everyone left a comment from the original date of the post (which for some reason says October 6, it was posted on November 2)for the cookbook until today will get one. That means knownbyname, Annette, Nora, Dandelionmom, Lisa@the cutting edge of ordinary, Kitty, and Shanae will be receiving a Heritage Garden Cookbook. Just email me at bccdheritagegardens@gmail.com with your mailing address and I will send one to you.

Tuesday, October 6, 2009

The Heritage Garden Cookbook

This year for the Autumn Pioneer Festival the gardeners put together a cookbook of recipes that represent the 5 gardens. The recipes vary from traditional 1800's recipes to the more "modern" (up to the 1950's) old family recipes. We offered it for sale at the Harvest Table at the Autumn Pioneer Festival.
Photobucket
I will be giving away two copies on the blog. All you need to do is leave a comment and after a week I will pick the names of two people who left comments and announce it. You then need to e-mail me with your address and I will ship them out.
There are recipes for Lefse, hops yeast and bread made from the yeast, pemmican, drunken crumble, and preserves; 60 unusual, heritage and really good recipes.

Thank goodness for sisters!

The Pioneer Festival was great this year. Lots of people attended, the weather was great and everything went smoothly except... I didn't get any pictures. That's where my sister saves the day. She took lots of pictures and posted them to her blog;
At Home With The Farmers Wife.(Click on this link for Day one of the Festival)

She even did two days on the Festival. Check it out.

Monday, July 13, 2009

Shortbread is Yummy!

Walker Shortbread Company is now an official Sponsor of the BCCD Cultural Heritage Gardens and the Scottish Garden! Their shortbread is a personal favorite. Yummy!

Monday, June 29, 2009

Rabbits, Potato Bugs and Heat, Oh My!

We have been out in the gardens for the last two weeks fighting weather (intense heat and humidity), Potato Bugs (the Irish Lumpers are leafless)and rabbits. There is a rabbit explosion this year. Not to mention the 6 cute baby grounhogs that are roaming the Yankee Garden, the cutworms wrecking havoc on the broccoli and the mosquitos dining on the gardeners and volunteers. Just another year in the gardens
Make sure you listen to the Potato Bug song in the music player lower right side of page. It's a hoot!

Thursday, May 28, 2009

Busy in the Gardens

The Heritage Gardeners have been very busy this past month. We have been planting, replanting (thanks to hungry mice eating the squash seeds) and transplanting in the greenhouse. We have been rototilling the gardens, planting the potatoes and peas and other cool weather crops. We are planting the rest of the gardens now that the frost date is past. We scramble in between rains to get plants in the ground. The mosquitos have arrived and the weeds are popping up all over.

We are also organizing Friends Of The Gardens a new group of volunteers that will work on fundraising and community outreach. We are working to develop new programs for youth and adults.

The Heritage Gardens are open for group tours starting in mid-June. Heritage Garden staff in period clothing take your group to the 5 gardens and 2 cabins while teaching about the people and plants they used in the mid 1800's in the Boone County area. If you have a group of garden friends who would like to tour the gardens and cabins please call the Boone County Conservation District offices at 815-547-7935. Cost per person is $5.00.

Tours are given to garden clubs, ethnic clubs, schools or camps, families, friends, anyone with a group of 8 or more people!
We hope to see you in the gardens!

Sunday, April 19, 2009

Last Frost Dates for Belvidere and Rockford

I have had many new gardeners ask "When is the last frost date for the Belvidere/Rockford area?" I usually plant with the date of May 15 as being safe. Belvidere and Rockford are in an area that gets different temps than Chicago. I consider us a zone 4 although many sites and charts list us as zone 5. I plant as if we are zone 4. After doing a lot of research on the internet, going to official government sites, the Farmers Almanac and extension sites, I will say that most of them had April 28th as the last frost date. The Farmers Almanac had at a 50% probability date; around May 15. I am planning on putting some lettuce seeds in the ground right around April 30 just to see what happens. Otherwise I'll wait till May 15th. Better safe than sorry.

Thursday, April 16, 2009

A Time To Sow.

This week Pat and I have been transplanting and sowing. We transplanted leek seedlings, broccoli and brussel sprouts. We have been planting seeds, lots of them, for vegetables, herbs and flowers. There were some teeny tiny seeds you almost have to hold your breath while planting, for fear they will blow away. Especially the German Chamomile.
I am always amazed that you sow these small objects and in a few months you have plants, in a few more months, food.
As I left the green house today I felt a great sense of accomplishment when I looked down the rows of flats. Rows of hope. Rows of wonder.

Monday, April 6, 2009

Recycling for the garden

I have always been one to reuse items in the garden. At our old house I had taken old pitchforks and stuck them in the garden. I attached bird houses on the top of the handle. That made them movable when I was weeding (as long as no one was living in them of course. I had an old iron bed that was a "bed of lettuce". I built a raised bed, attached the frame and plated my lettuce. I made a quilt of the different colored lettuces. When the lettuce was done I planted annuals then in the fall I transplanted the annuals for fall color to other parts of the garden and replanted lettuce in the bed. I have made old workboots into planters, taken an old iron heat grate and used the grate part of it to cover my cistern hole and the frame part was hung as wall art.
When we moved into our new home, a 50's ranch, there was a big brick planter that was attached to the front of the house.
I tried planting flowers in it the first year but the soil was dead and nothing would grow so I needed to come up with another solution. Since I love water in the garden I decided to make it into a goldfish pond. I dug out the soil to the depth I wanted and tamped the remaining soil to harden it.Photobucket
I then added a heavy pond liner.
Photobucket.
I used a heavy duty contruction adhesive that bonded to cement. I added wood to hold it in place till the adhesive dried.
Photobucket
When it was dry my husband bordered the top of the liner with cedar, I added water and a filter and let it sit for a week before I added my fish. I added plants and was happy with it but it still needed more.
Photobucket
I wanted a fountain. I took an old fluorescent light fixture we had removed from our kitchen, removed the guts and painted the frame copper.
Photobucket
I added tiles I got from the Habitat for Humanity Reuse store and attched them to a cement board backing. I drilled a hole in the top tile and added a box for the water to fill up and I had a fountain. We hung it on the wall above the pond and it pathetically poured into the pond. I had wanted a wall of water.
Photobucket
So I decided to add fountains in the pond. What to use? I have always like stone and spheres and symmetry so I chose bowling balls! I went to the local resale shop and bought three bowling balls for 1.99 each. I had my husband bring home a masonry drill from work and he drilled the holes for me. Photobucket
You can also go to a bowling alley that has a pro shop and have them drill the holes for you. I sprayed on a primer. Then a spray on product that looks like stone, then a top coat of sealer.
Photobucket
I used pvc pipe, recycled from a work site dumpster, to hold them up to the right hieght in the water.
Photobucket
Photobucket
And this is the finished project. I love it! It will be even better when it warms up enough for me to add my fish and plants!

Friday, April 3, 2009

A Winter Gardening Fix

As a gardener living in Northern Illinois, winter can seem like forever. Perusing garden catalogs fills the void in January, making garden plans helps in February, but by March I am just itching for the smell of soil and plants. So the only solution is to head out to the Chicago Garden Show.
Pat and I went on a cold and rainy day into Chicago, which is a 2 hour drive (in Chicago traffic) from Belvidere. As soon as we walked in the smell of flowers hit us. It was wonderful. We were instantly drawn to the displays and oohed and aahed over all the plants. My particular obsession is with water gardens. Anything with water draws me in. Below are just a few of the many pictures I took of the water features.
Photobucket
This was a small waterfall that went into a rock depression instead of a pond.
Photobucket
This picture shows a downspout filter that saves water to be used in water features. A pump and hose can be attached sends the water to a pond, fountain, stream.
Photobucket
This fountain is made up of rock formations that have been drilled and put together to form a grouping. Pricey for the poorer gardener!
Photobucket
This is a fantastic alternative to the above fountain. Concrete forms were used to make the 3 pillars in this version. I love this idea!
Photobucket
Mood lighting, water and fog, what more could you add?
Photobucket
This guy is just plain funny!
Photobucket
Simple and calming.
Photobucket
This was a Mexican fountain. The water came out of the structure and poured out over the stone slab.
Photobucket
This is a picture of my house, an old 50's ranch. See the brick planter attached to the front of the house? Next post I will show you how I turned it into a fish pond and show you my recycled fountains.
I know this has nothing to do with Heirloom plants but I can't resist sharing!

Friday, March 20, 2009

It's Spring! Time to Start the Ground Cherries

It's official. The first day of Spring. To celebrate I am going to start the ground cherries.Photobucket
Ground Cherries are in the tomato family. The ones we grow in the BCCD Cultural Heritage Gardens have a pineapple/strawberry taste. They are in a paperlike husk and when ripe the husk falls off the plant. That's when you pick them off the ground. Try not to eat them as you are collecting so you have enough for a pie or preserves.
The seeds you see here are from the BCCD Cultural Heritage Gardens.Photobucket
Last Fall Pat and I gathered some ground cherries. When they started to rot we processed the seeds by placing them in water. We let the water get moldy, slimy smelly, then strained and rinsed them. We then dried them and packaged them for our sale. Pat was the patient one who cut out the squares of waxed paper, placed the seeds in the middle, then folded it into nice packets.
I am starting my seeds by presoaking them. It is a good way to give them a head start. Seeds need to soak up water before they can sprout, so by presoaking I can save a few days in the sprouting process.Photobucket
I wash old plastic containers from yogurt, margarine, whatever I have, in the dishwasher to sterlize and then drill 1/4" holes in the bottom for drainage. I add my soil mix which is not potting soil but seed starting mix which you can buy in bags at the local hardware store. I even out the soil, add my seeds then put a light layer of soil on top of the seeds. I set the container in a pan of water till the soil turns dark. That means the soil has absorbed the water and is wet. I then put the container in a plastic bag, seal it up and put it in a warm spot. On top of a refrigerator works great. Keep an eye on them. As soon as they sprout you need to move them to full sunlight or a grow light. Remove the pot from the bag, place in a tray (I use sterilized old Styrofoam or plastic meat trays)and fill with a small puddle of water to keep the pots moist.
That's how I start my tomato and pepper plants too. I use my ground cherries to make a great custard pie. I got the recipe from an old 1800's cookbook I have.

Ground Cherry Pie
2 unbaked pie crusts
3 eggs, beaten
3/4 cup sugar
1/4 teaspoon salt
1 teaspoon vanilla extract
1 egg white
2 1/2 cups scalded milk
2 cups ground cherries

1. Preheat oven to 400 degrees F.
2. Mix together eggs, sugar, salt, and vanilla. Stir well. Add the milk
3. Line pie pans with pastry, and brush inside bottom and sides of shell with egg white. Divide custard mixture in half and pour into piecrusts. Put 1 cup of ground cherries on top of each pie.
4. Bake for 25 to 30 minutes, or until a knife inserted near center comes out clean. Cool on rack.
Enjoy!